
As many of you will already know, I’m a huge fan of Discus having kept and bred them for many years. Conscious that many of the blog articles I’ve written relate to marine fish, I thought it time to return to Tropicals – and there’s no finer freshwater tropical fish than the Discus.
In this article I’m going to introduce Discus as a species and then detail how to go about setting up an aesthetically pleasing community tank for them. I’ll detail how to set up the aquarium, the equipment that is needed and the stages to follow. I’ll also take this a stage further than my previous articles, suggesting plants that will be appropriate and complimentary species that will thrive in your aquarium, alongside your Discus.
Firstly, let us have a look at what we’re hoping to achieve. We have alongside, a video of a beautifully presented planted Discus aquarium. In this fish tank there are Amazon Swords, Vallis and Anubias, feature bogwood and a fine gravel base. To keep our Discus company, we have a shoal of Rummy Nose and Cardinal Tetra. I think we’ll all agree that such an aquarium would make a fantastic addition to any home.
Over view of Discus (Symphysodon spp.)
Discus are a member a member of the Cichlid family that originate from the margins and flood plains of rivers and lakes of the Amazon. There are thee known forms of the Discus species that originate in different areas of the Amazon Basin. Symphysodon aequifasciatus inhabits the Rio Solimões, Rio Amazonas and the Río Putumayo-Içá in Brazil, Colombia and Peru. Symphysodon discus can be found within the lower reaches of the Abacaxis, Rio Negro and Trombetas Rivers. Finally, the Symphysodon tarzoo can be found upstream of Manaus.
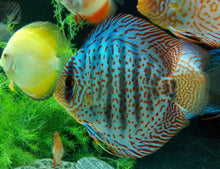
Most of the Discus available these days in the UK are actually farmed rather than wild caught, and selective breeding programmes have created a wide variety of colours and patterns, ranging from white through to bright turquoise or reds (or any combination!). It is possible to obtain Wild Discus, which are truly outstanding with their natural colourations. These are generally available in the UK during September and October.
The geographical location from which Discus originate helps us to understand the water conditions that they require – they like soft acidic water with a pH of around 6.5, however in the wild they have been located in waters with pH as low as 4.0 and which is the same colour as herbal tea! Commercially farmed Discus will however be comfortable, and will indeed prosper in a an aquarium with a pH of 6.5 and a low Carbonate Hardness (keep in mind that wild caught Discus will be more sensitive to their conditions, making them more difficult to keep – as such, I’d recommend you start with commercially farmed Discus).
Not only are Discus beautiful with their colouration, they also have an extraordinary breeding habit which is only shared with one other species in the aquatic world (the Uaru) – they feed their young! Discus pair together and lay eggs on vertical surfaces, for example bog wood roots, which they defend against competing fish and fan constantly with water to keep the eggs clean and oxygenated. As the eggs start to hatch, both parent fish develop a mucus all over their bodies which provides nutrition to the fry that have hatched. It’s quite something to see a swarm of fry feeding from their parents, one of the great joys of successfully keeping the species.
Creating a Discus Community Tank
Discus like to live in groups, unless that is a pair forms – in which case you might need to re-house some of your fish (most cichlids can become aggressive with their own species). The intention of this project is to create a Discus Community aquarium, large enough to house four adult Discus, or a breeding pair.
To successfully house four adult Discus, we’ll need an aquarium no smaller than 200lts. In this example, we’ll use a Juwel Rio 240 as the starting point.
The Juwel Rio 240 is delivered complete with a suitable filtration, heating and lighting system, all of which are perfectly sized for a Discus Community tank. In addition to this, we’ll also need:
- Lime Free Gravel
- Undergravel Heating Cable
- Bogwood
- Reverse Osmosis Unit
- Waterlife Biomature
- Test Kits (pH, KH, Ammonia, Nitrite and Nitrate)
- Juwel HiFlex Reflectors
- Live Plants
Positioning the Aquarium
Discus, like most fish are sensitive creatures and appreciate their home to be positioned where it will not be regularly disturbed e.g. not next to a door that regularly slams. Ensure the tank is located away from any radiators and ideally does not have direct sunlight shining into it – this will cause you algae problems in the future. Also make sure you have a power supply that is conveniently located.
Starting the Set Up – Setting up the Substrate
Once the tanks if fully assembled and located in the correct position, it’s time for the fun part, starting the set up! The first thing to do is add the heating cable. This should be spread positioned below the main planting areas of the fish tank, before the gravel is added. Heating cables create small convection currents in the gravel substrate which helps to bring nutrients to the roots of your plants, whilst preventing stagnant conditions from developing.
Once the heating cable is appropriately positioned, it’s time to add the gravel substrate. It is fundamentally important that you use a LIME FREE substrate, as any lime which is often naturally occurring in gravels will cause the pH level of your fish to increase. Please make sure you don’t cut corners here, and if you’re not sure, don’t use the substrate. The Seachem Flourite range is perfect for a planted Discus aquarium, with the darker colours really helping to bring out the colouration of your fish.
Before adding the substrate, thoroughly wash it to prevent any fine particles entering the fish tank. I’d recommend using a fish net and a hose pipe! You won’t remove all of the fine particles, however thoroughly washing the substrate will help to reduce the amount of time it takes for your water to clear once added.
Once cleaned, delicately add the substrate to the fish tank, adjusting it so the depth is greater at the back of the tank to the front. This will help to provide a depth perception, whilst helping any detritus to fall to the front of the fish tank where you can see it to remove it.
If you have any nice pieces of bogwood, again thoroughly wash this first, and now’s the time to add this too. A few large pieces of bogwood will really make you fish feel at home. Try to ensure you have a number of pieces that you can place vertically. If you’re lucky enough for your fish to breed, they’ll likely select one of these vertical pieces of bogwood to lay their eggs on.
Adding the Water
Now that you’ve added the substrate and bogwood, it is time to start filling the aquarium. We recommend using Reverse Osmosis water if you live in an area that has hard water e.g. the East Midlands where we have liquid concrete running through our pipes. If you’re lucky enough to have water that is slightly acidic and soft, then nice one, that’s going to make your life easier!
I won’t go into detail here about using a Reverse Osmosis water filter (we’ve written an article about this already which can be found here).
Slowly fill your fish tank with the water, trying to ensure you do not disturb the substrate which you’ve carefully crafted! I personally use a maxijet powerhead with a piece of hose attached, to pump the water into the fish tank from a bucket. I pump the water into the Juwel filter housing, which further reduce any possibility of disturbing the substrate.
Switching on the Electronics
When the fish tank is full of water, it’s time to switch on the electronics! A handy tip is to use a 4 way gang plug to allow you to have just one plug going into the mains, into which you can plug all of your other electrical equipment. Another tip is to label each plug as you go along, so if you need to disconnect your heater for example, you know which plug to pull out!
The Juwel filter has all of the media you need and an appropriate flow rate for a Discus tank. Ensure that the outlet of the filter is positioned to agitate the water’s surface, as this will help to reduce any films of detritus from forming.
It’s a good time to add the Juwel Reflectors at this point, as even though you don’t need to turn the lights on yet, it’s hard to resist!
Testing the Water Conditions
Well if you’ve used Reverse Osmosis water and a Lime Free substrate, when you test your aquarium water at this point you should find a very low KH and a neutral pH. Pure Reverse Osmosis water is actually too pure for your fish to survive in. As such, we need to add a product such as Seachem Replenish, to provide the necessary salt to create a stable pH.
Ideally you’re looking to recreate a pH of approximately 6.5, and rather helpfully a number of manufacturers create buffers that are specifically designed to achieve this, which can be found here.
Another great way to authentically replicate your Discus’ natural habitats is to add Peat to your filter. This will add tannins to the water, making it appear more tea like – whilst helping to acidify the water – making your fish feel at home.
Maturing the Fish Tank
Now your fish tank’s water has the correct hardness and pH, and once it has reached the correct temperature for your fish (Discus like a high temperature of around 82deg F / 27deg C), then you’re ready to start maturing the filter.
I’m a firm believer of using products to mature the filter in your fish tank, rather than stressing a few unlucky fish that have to live through the experience! We have a number of products that allow you to build the appropriate bacterial colonies in your filter, helping to break down ammonia into nitrite, and nitrite into nitrate. Again I won’t go into detail about how this happens, if you’d like to know then click here.
Using your test kits, once you’ve seen that the nitrite levels have reached zero, it is time to start adding your plants.
Planting your Fish Tank
As noted, Discus like a nice warm fish tank which can be troubling for many aquatic plants. As such we recommend using Vallis, Amazon Swords and Anubias – as all are happy in this Amazonian biotope. Place the Vallis at the back of the aquarium to create a great back drop. Adding a few nice large Amazon Swords will create another texture to the aquarium. Finally Anubias place in the mid for foreground will create a great overall effect.
Adding your Community Fish
The most important piece of advice I can give you here is – Don’t go out and buy all your fish at the same time! Not only will this be an expensive shopping trip, it will also overwhelm your fish tank filter with the increase biological load arriving on the same day.
Here’s how I would stock the fish tank. I’d start with 6 Cardinal Tetra. They should be brought home from your local aquarium store (we’re in Bexleyheath and we have plenty in stock!), then float the bag in the top of the aquarium – and turn the lights off. Leave the bag floating for 30min whilst the water adjusts to the correct temperature, then cut the corner off the bag and let the fish gently swim out into their new home. If you leave the lights of the fish tank off for the rest of the day, you’ll find the fish will settle in quickly.
The following day when the lights come on, all being well you’ll have a small shoal of Cardinal Tetra exploring their new home.
If you monitor your water parameters for ammonia and nitrite, assuming you don’t see any, you’ll be ready for the next batch of fish next weekend. This time I’d recommend 6 Rummy Nose Tetra.
I’d continue in this manner, adding the following fish over the next few months:
- 4 Bronze Corydoras to help eat food that makes its way to the bottom of the tank
- 2 Bristlenose Catfish to eat any algae that forms on the glass/bogwood
- 4 Marbled Hatchet fish which will add movement at the top of the fish tank
- 2 Rams (a male and female) which are a fantastic, colourful dwarf Cichlid
As you continue to add new fish, make sure you keep an eye out for any diseases that may have been introduced whilst continuing to monitor your water conditions. You should be feeding your fish a few times a day with both flake and frozen food – and after 2 months of settling in, all should be well.
If it is, then it’s time for the Discus! If not, be patient. Discus are sensitive creatures and should only be introduced once you’re certain the fish tank is running nice and smoothly.
Selecting and Adding your Discus
Whilst Discus are delicate, they’re also Cichlids which means they do have a bit of an attitude! A 240litre tank should easily sustain 4 adult Discus, or a breeding pair. Rather than just buying breeding care (which can be incredibly expensive), I’d recommend buying 4 juvenile Discus, no smaller thank a 50p coin.
Make sure you study the fish in their holding tank at your local store carefully. You’ll already see that there is a hierarchy within the fish tank. I’d recommend buying the stronger fish that are higher in the hierarchy, as fish that are already being bullied by their housemates may succumb more quickly. If any are particularly dark in colouration, I’d avoid them myself. If the fish are the size of a 50p coin, there is no way to sex the fish. By purchasing 4, there’s a good probability you’ll have both males and females.
Once you’ve selected your fish, your aquarium shop keeper should pack each fish separately in a double bag, to prevent the fish from damaging each other in transit and to prevent them from piercing their travel bags with their sharp spines.
Follow the same process for adding your Discus to their new home as you have with your other fish, turning the tank’s lights off, floating their travel bags for 30 mins, and then slowly releasing them into their new home.
If you leave the lights off for the rest of the day, switching them on the following morning, you should see your new arrivals settling in nicely. Over the next few weeks a hierarchy will develop and you’ll see your fish interacting. Don’t worry though, if your tank is nicely planted then your fish should have places to hide.
Keeping your Discus
Once your fish have settled into their new home, offer them food little and often throughout the day. There are a large number of foods available specifically designed for Discus, such as Seachem Nutridiet Discus Flakes, Tetra Discus Colour and New Era Discus Pellets. An automatic feeder is a great way of feeding your fish whilst you’re at work.
In addition to feeding dry foods, make sure you feed your fish plenty of frozen. Bloodworm is a particular favourite – and all your fish will thrive if supplied with plenty of them!
With this well balanced diet, you should find your fish growing really well.
Maintaining the Aquarium
Whilst your fish tank filter will break down Ammonia to Nitrite, you will find over time that Nitrate will start to develop. Your fish are not going to like this, and the sensitive Discus will find it troublesome first! As such, regular water changes should keep this problem in hand. I’d recommend doing a partial water change of your fish thank every weekend. Replacing approximately 30 litres of water ever week, using the opportunity to get your gravel cleaner our will keep the tank nice and healthy, promoting their growth.
If you’re using Reverse Osmosis water, ensure you mix this well in advance before you do the water change – you should not mix this water straight into the aquarium. I’d recommend keeping a water butt in your garage if you have the space, so you know you have water ready to go whenever you have the chance to do a partial water change.