
In this article we’re going to take a look at Reverse Osmosis (RO) water filters, explaining why we use them and how they work. We’ll also cover the maintenance side of RO units, to help you keep your unit up and running.
The fish within our aquariums live in a closed loop system, with a significantly smaller volume of water than they would normally encounter within their natural habitats. If we imagine that we lived in an airtight container, the conditions within which we lived would deteriorate over time, ultimately leading to our demise. The same can be said about the habitats we provide for your livestock. Over time toxic Nitrates will often increase, as will phosphates, resulting in loss of livestock and a less enjoyable fishkeeping experience (it will be difficult to see our fish due to the nuisance algae). It is for this reason that we need to regularly implement partial water changes, to ensure that these problems are avoided.
But what if the water we use to replenish our fish tank already has high levels of nitrates or phosphates? In these circumstances, partial or even full water changes are not going to help, as you’ll be continuing to add Nitrates and Phosphates into the aquarium.
Alternatively, what if you’re living in a Hard Water area, such as the East Midlands, and you want to keep Softwater loving sensitive fish, for example Rams or Discus? The options available are very limited. You can either collect rainwater (not very reliable), use a Deionisation Resin to remove the hardness from the water (which is very expensive), or you can take the third approach, invest in an Reverse Osmosis Unit.

RO Units are a great investment if you’re looking to keep sensitive livestock which demand that the water within which they reside is of the highest quality, e.g. if you’re keeping reef inverts or wish to keep softwater species within a hardwater area. The filtration used by your RO unit will remove pollutants such as Nitrates and Phosphates from your water, together with minerals and salts, ensuring you have access to water that is 99% pure. From this starting point, you can engineer your water using buffers and additives, to ensure you provide perfect conditions.
So how does a Reverse Osmosis Unit actually work?
If you have a look at the RO unit in the picture here, you’ll see that there are 3 hoses attached to the filter, and 3 canisters (some have more than 3 but we’ll come to that later). Water is fed into the RO unit by a small hose that you connect to your tap, in the same manner as a hose pipe. Within the first canister, a sediment filter is placed. These usually capture particles larger than either 5 or 1 micron in size, ensuring that all but the tiniest of particles, particles that we would not usually even see, are removed at the entry point to the water filtration process.
Once any sediment has been removed, the water is fed through to the second canister, within which a Carbon Cartridge is installed. As the water passes through the carbon cartridge, any chemicals such as chlorine are removed from the water. At this point, all of the preparations prior to the final filter stage are complete – the reverse osmosis stage.
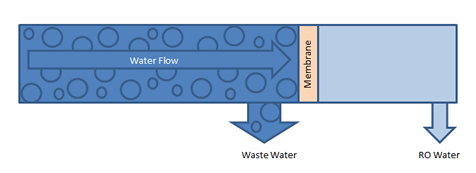
The final cartridge of the RO unit (normally the one at the top) has water pushed into it. Within the cartridge is a semi-permeable membrane. This filter media is so fine that it only allows pure water molecules to pass through, with all other constituents of the water being blocked.
We mentioned that there are two other hoses not accounted for in our description. One of these hoses (usually blue in colour), is where the pure RO water is forced out of the filter, the water that has successfully passed through the Reverse Osmosis Membrane. Not all of the water that has fed into the final cartridge is able to pass through the membrane, as it will include impurities that can not be forced through the filter. This is what the final hose is for - it allows ‘waste’ water to leave the filter – which will include the impurities that have been stripped from the RO water. The diagram below shows this:
One drawback of Reverse Osmosis systems is that they do waste a lot of water – only 10 to 15% of the water that enters into the RO unit will emerge as pure RO water, the rest will be waste. When we say waste, it’s not totally waste water! Whilst it’s no good for our inverts or Discus, it’s great for the garden or for washing the car!
We mentioned earlier that most RO units have 3 canisters, some however have more. These are usually either additional sediment filters, or a De-ionisation cartridge that is placed after the RO membrane, through which RO water is past. As noted, De-ionisation is an expense process due to the costs associated with the resins used. By only filtering RO water through these resins, they last significantly longer as the RO unit will have stripped out 99% of the impurities prior to them entering this final stage. If you’re after the purest of pure water, a de-ionisation cartridge will provide a final polish to your RO water!
And now a note about water pressure. For RO units to operate efficiently, a great deal of water pressure is required. Speaking from personal experience, you’ll need to have your tap on full, for a trickle of water to be forced through the filter. If you’re in a low pressure area, it may take several days to create even 100lts of RO water, so keep this in mind. To address this, I feed my RO water straight into a water butt for storage. This way I can be assured I’ll have sufficient water for regular top ups and water changes.
If you’re really struggling with water pressure in your area, a booster pump can be purchased which will address this issue, allowing you achieve outputs similar to those the manufacturers describe (you’ll notice that RO units are all rated by the volume of RO water they can produce in a day, in US Gals). Another interesting point to note, in winter months when the water pushing through the system is colder (and denser), you’ll have a reduced output!
OK, so now we’ve provided a quick outline as to how RO units operate, and given the tip that a water butt to store your RO unit is a great investment. Now let’s look at maintenance.
There are two elements of the RO unit that will need regularly changing. The sediment filter will over time clog, as any mechanical filter media does. It is recommended that you replace this every 3-6 months dependent upon usage. The other component that will require regularly replacing is the Carbon Cartridge, as the carbon within it will become exhausted. Again, replace this every 3-6 months dependent upon usage.
Please note that it is extremely important that you change the carbon cartridge in particular. The membranes used in RO Units degrade if exposed to chlorine, and it is the carbon cartridge that removes this. Replacing a Carbon Cartridge costs approximately £15, however the great majority of the cost RO unit is attributed to the membrane. Replacement membranes are in the region of £75, so it makes good sense to change the carbon cartridge regularly!

One final thing to note. If you’re looking to see just how well your RO unit is performing, a TDS meter can be used to measure the Total Dissolved Solids of the water produced. The lower the TDS of the RO water produced, the purer the water. So if you see the TDS increase, it’s time to replace the cartridges.
We hope that this brief over view of Reverse Osmosis filters helps, and if you have any questions then please feel free to contact us.